Friday 31 August 2012

Oilcloth Bunting Tutorial & Giveaway


We have this lovely area off the side of the house, we've got the usual patio furniture there, a BBQ and all around these lovely planters, when we moved in, in February they were bare. Then Grannie & Grandad came over and on Mothering Sunday we went to the local garden centre and bought some lovely plants & herbs. Grannie & Grandad set about to turn our bare drab planters into something beautiful. As the planters looked so lovely I thought I'd spruce the boxes with some gorgeous colorful oilcloth bunting - I bought the oilcloth in Australia from Me Too Please  -  they have the best selection of oilcloth and gifts. I brought the oilcloth over with me, so it was a great excuse to use it.


I was especially happy with how the bunting turned out and how it brightened up the garden. I made the bunting especially to fit this area, and I have recently made some bunting for family in Canada.
  
Here's The Tutorial

The bunting is really easy to do, first I made a triangle template measuring 12' x 8" out of card and used this card to draw around on the oilcloth. I usually use a pencil but here I have used a marker pen so you can see the triangles.

Using a pen draw around your triangle

Next carefully cut out your flags following the pen/pencil lines - I usually do 15 flags per bunting - you can do more or less.

Carefully cut out your triangles (flags)

Once the flags are cut out decide which order you'd like them to be, I always find this the hardest bit deciding, once you've decided it's time to get sewing.

Place your flags in a neat pile
Decide your order of flags

I usually buy the ready made bias tape to sew the flags too, I start by tidying up the ends of the bias tape by folding in the end about 1cm, folding it back in half and sewing into place.

Ready made bias tape makes it so easy
Fold in the end of the bias tape 1cm
Fold back in half and sew

Then measure 20cm (or the length you would prefer) along the bias tape and mark, this is for tying the bunting up, sew along the length of the bias tape, close to the edge, to the marked point, stop sewing, leave needle in and lift foot, insert your first flag in between the bias tape, making sure the top of the flag is at the fold.

Sew along the bias tape close to the edge

Sew along to the other side of the flag and before continuing I measure and the mark the next 10cm's (or the length you'd prefer between your flags) which just so happens to be the width of my machine from the needle.

Measure desired length between flags and mark

Continue sewing until you reach your next mark insert flag and sew, repeat until all flags sewn in.

I find I will need to use 2 packets of the ready made bias tape so when I am near the end of one piece I join the next piece to it using this tutorial (which is also good if you want to make your own bias tape).

Or an easier way would be to join the two bias tapes together before starting to sew the flags on.

Once all the flags are sew on, I continue sewing another 20cm's to the end. I then tidy up the end of the bias tape as I did to begin with........

.......And voila you have one set of oilcloth bunting ready to display.


I've made mine one-sided bunting perfect for displaying against something but if you want to display the bunting so both sides are showing, but you don't want to sew the oilcloth together, as oilcloth can be difficult to sew. An easy way is to insert two flags wrong sides together into the bias tape and sew. they can be matching or non-matching flags depending how you like it.

Another tip is if your oilcloth is creased you can iron it out - put your iron on a low temperature and cover the oilcloth with a tea towel and iron - do not use a hot iron oilcloth melts - I found that out

And if you do like the bunting I have made, one lucky reader can be in the running to win this bunting.

To enter -  like my Facebook page and comment below saying where you'd like to display your bunting and you'll be in the chance to win it. Don't forget to leave me your email address too so I can contact you.

Good luck

PS Please share your homemade buntings with me I'd love to see them


Sunday 26 August 2012

Big Weekend - Mr C's Birthday

The best way to start the weekend is having the girls grandad, more commonly known as D-Dad arrive (my dad) on Friday - although immigration did him no favours, they confiscated my beef Oxo cubes and it took him over 2 hours to get out, but that aside he is here safe and sound woo hoo.

Then Saturday was Mr C's birthday and Mr C loves birthdays so with that in mind I thought we'd make his birthday extra special, so the day started with his favourite breakfast - Eggs Benedict with homemade hollandaise sauce, and a present treasure hunt complete with clues.


The girls & Mr C had so much fun, but we saved the best surprise for last and took Mr C on a road trip to........ Legoland - yeah we all love Lego in our family so I thought it would be a great day out for all of us.


And a great day out it was, there was a huge Lego display of Chicago with all the major places/buildings of attraction, a Jungle area, Star Wars, a great Laser Quest game ride, Lego Friends, a 4D movie, Lego stations you could build to your hearts content, which we did, and much more - it was truly a great day out and we saved $30 on our admission by having a Legoland coupon

After our huge day at Legoland - yes there is more, we did the birthday boy his birthday cake - all home made by the girls and I and we had fun making it the day before.


And in the evening we went out to dinner to Mr C's favourite pizza restaurant Spacca Napoli - it's a fantastic authentic Italian serving great pizzas, great desserts and great coffee.

All in all we had a fantastic day out celebrating Mr C's birthday.  


Tuesday 21 August 2012

Ruby starts Kindergarten In 2 weeks


Two weeks today and my baby starts school, except she's not really my baby anymore but my big girl. We're nearing the end of 3 months of school holidays, yes you heard me right, we have 3 months of Summer holidays here and Ruby will finally be starting Kindergarten.

And luckily Ruby is very excited about starting school, so far she is taking everything in her stride, but we'll see on her first day how different it may be.

Ruby's Kindergarten teacher - Miss Scott came round for a home visit today to introduce herself to us and to meet Ruby. She gave me some information on starting Kindy and Ruby a blank piece of paper, Miss Scott asked Ruby to draw a self-portrait on it and bring it to class on her first day, so eager was Ruby, she did it there and then.

Ruby's Self Portrait

During the holidays, the School Ruby will be attending has been in touch to organize playground play dates prior to starting school. It's a chance for the kids (starting Kindergarten) & parents to meet to say hello and get familiar with one another at the school playground before school starts. I think it's a great idea.

We also get to attend a meet and greet at the school prior to them all starting too - so far so good I'm loving how they are getting us ready for Kindergarten. 

What I'm not liking though is the list of school supplies we need to provide for the year - here is the list for Kindergarten children but at least it is only once a year.

A change of clothes
2 packs of low odour fine point black dry erase markers
1 box of 24 Crayola Crayons
4 boxes of Crayola washable markers
3 packs of glue sticks
1 4oz bottle of Elmer's white glue
1 pack of colored pencils (sharpened)
2 packs of pencils (sharpened)
1 pack of multicultural colored pencils (sharpened)
1 box of any size Ziploc bags
1 bottle of pump soap for washing hands
1 bottle of pump hand sanitizer
3 large boxes of tissue
2 rolls of paper towels
Gym shoes to be kept at school

Ruby & most of her school supplies

Do you need to provide this much for your child before they returned to school?

It's certainly a lot bigger than my list of school supplies was......

We also have to have a child health examination done, performed by a pediatrician, plus eye & hearing tests done and that's before she starts school - luckily I have very robust kids neither one has had anything more serious than a cold and neither yet has had a course of antibiotic, although what I am told this will probably soon change.

And we waiting to hear if she'll get to ride the (iconic) yellow school bus to school as we live on the very edge of the school boundary/catchment area, quite a way from the school, but for now I will be taking her.

How naive was I - I thought you just sent them to school with a new backpack and set of pencils.


Thursday 16 August 2012

Rainy Day Craft - Salt Dough Creations

I love Pinterest, I love pinning, I love to see what other people are pinning and I love to do/make the things I pin, although I'd probably make and do more if I spent less time pinning, I think all pinners out there would agree with me on this one. And if you are the slightest bit interested in what I am pinning you can find my Pinterest boards here or click on the icon to the right. I'm a happy pinner.

So it was a rainy day here in Chicago a couple of days ago, we'd had a lovely play date in the morning but I was wondering what to do with the girls in the afternoon, so a quick look in my Crafty Kids Ideas board and salt dough it was - I followed this recipe but halved the ingredients.


I used my KitchenAid mixer to do all the hard work for me and off we went to create, and it was fun, really good fun, I explained to the girls they could make ornaments for our Christmas tree, coasters to put drinks on, jewellery, they could even use the letter cutters to do their own names or whatever they wanted to do. We'd make & bake them, but paint them the next day (as I didn't have any acrylic paints).


And the girls got busy, we had stars, dinosaurs, trees, people all sorts of things were being made, Tilly really enjoyed the cutting out and rolling, she made lots of items.

Ruby did less items but more precise - the difference between a 3 & 5 year old.


Even I had a play can you spot mine....but the girls were reluctant to give up any more dough for me so next time I will make the full amount, the girls still managed to make quite a few things and here is what we came up with ta da.....


Into the oven they went at 300f for about 20 mins - thicker pieces need longer (you can also air dry the salt dough takes about 2 days to dry out completely).  We let them cool down overnight and a quick trip to Michael's the following morning to get some acrylic paints and varnish, we had fun painting them all.


 I bought a box of 16 paints and they had great colours in for the girls to paint with, the pots are only small but a great intro into acrylic paints for us as we've never used them before but we do like them


This craft kept the girls busy for ages and ages and again you can see the difference between Tilly at 3 painting and Ruby, Tilly is more slap it on in whatever colour she likes, but Ruby is more precise and careful with her colour choices, it was fun watching and helping them, not that they needed much help.

After we let the pieces dry completely we gave them a quick varnish and voila here are our finished results


I'm particularly liking Ruby's rainbow snake and Tilly's purple angel.

This is a great craft activity for all ages of kids. 

Tuesday 14 August 2012

Yummy Pumpkin Apple Streusel Muffins


I love baking so when I had tried some apple pumpkin muffins on my holidays I knew I would be baking these beauties at home.

I'm not a big fan of pumpkin, only really liking it roasted or as a soup, so when the muffins first appeared at the breakfast table (on our Amish farm stay) and I was told what they were, I immediately turned my nose up and thought I wouldn't like them. It wasn't until another guest and Ruby said how delicious they were, that I gave one a try and yummy it was.

So this afternoon the girls & I thought we'd give them a try,  a quick look on the internet and we found this recipe.

Pumpkin Apple Streusel Muffins

Ingredients
2 1/2 cups all purpose (plain) flour
2 cups sugar
1 tbsp pumpkin pie spice
1 tsp baking soda
1/2 tsp salt
2 eggs, lightly beaten
1 cup canned pumpkin
1/2 cup vegetable oil
2 cups peeled, cored finely chopped apple

Topping
2 tbsp all purpose flour
1/4 cup sugar
1/2 tsp cinnamon
1 tbsp butter

Directions
1. Preheat oven to 350 degrees F (175 C) and prepare muffin tin.
2. In a large bowl place all your dry ingredients and mix well.
3. In a separate bowl mix together eggs, pumpkin and oil.
4. Add pumpkin mixture to flour mixture, stirring just enough to moisten. Do not over mix.
5. Gently fold in apples and spoon batter into prepared muffin cups.
6. Topping - In a small bowl, mix together flour, sugar & cinnamon and rub in butter until mixture resembles breadcrumbs.
7. Sprinkle topping over muffin batter.
8. Bake in a preheated oven for 35-40 mins, or until a skewer inserted into a muffin comes out clean.
9. After allowing to cool, serve with a nice cup of tea and enjoy.

Ruby spooning the mixture into the cases
Tilly sprinkling the topping onto the muffin mixture

And of course I had my little helpers, helping out with the baking.

We halved the recipe as I didn't have much sugar left and we got 12 good sized muffins from it. Next time we make these, I'm going to experiment and use wholewheat flour, slightly less sugar and no topping (to make them a bit more healthy)

As the girls loved the muffins, they will be a firm favourite in our home and a great lunchbox treat too.

One last instruction - make a cup of tea/coffee, sit down and enjoy


Monday 13 August 2012

Knit One Purl One - My New Hobby

My Nanna taught me to knit years ago, when I was a little girl, she did pretty well teaching a left hander (me) the basics and she taught me the right handed way. Go Nanna

Other than a basic knowledge of knit one purl one and the odd scarf knitted in moss stitch I have never knitted anything other than a scarf, and I can't read knitting patterns to save my life, but since moving to Chicago and stumbling upon a gorgeous yarn shop, Close Knit, I decided I'd at least try to knit something that wasn't a scarf and lucky for me the shop was doing classes starting soon and on the mornings I have both girls in pre-school yeah.....

I wasn't sure what to expect at Close Knit so with a coffee in hand off I went and Lucie the teacher (& owner) explained it was more like a drop in knit/crochet session, everyone brings in their work and Lucie helps out with any problems, teaching, so with me, as I could at least knit, it was about getting me knitting and reading patterns so I chose to do a baby's hat,  I picked my yarn and Lucie handed me some circular needles!!!!! now I was stumped , I have no knowledge of circular needles, needles are grey, long straight and plastic aren't they?

Embarrassingly I couldn't even remember how to cast on, so luckily Lucie was at hand to remind me and I got started, it didn't take me long to take to the circular needles I loved them, by the time the next week came along I was ready to start decreasing which Lucie showed me how to do, then she brought out the double pointed needles (DPN's) what are those for? I asked oh that's the next bit Lucie replied and with some instruction and guidance I was now knitting with 4 DPN's wow who would have thought it, circular & double pointed needles all in 2 weeks. I was also very lucky to have my mum in law over, who is a knitting whiz, to help me out with dropped stitches and there were a few of those in between my classes. In no time I had finished my first baby hat and I was hooked.

My First hat knitted on the right

My next project I chose was this gorgeous Baby Jacket by Debbie Bliss I found on Ravelry, Lucie helped my choose the right yarn, I selected a neutral cream colour as it was for a friend who's baby was due soon but we didn't know the sex. Out came the circular needles again and this was knitted in one piece and was easy for a beginner to do. Lucie helped me with the picking up stitches to do the collar and showed me how to join the seams and block the garment. As I had some yarn left over I knitted another baby hat to go with the jacket, I loved it so much I did another one in green as by then, my gorgeous friend had had her baby, a lovely beautiful boy and I forgot to take some photos of the jackets oops.

Next up was a Kina cardigan for Tilly, found here, Tilly picked out the yarn herself - luckily this was so easy to do, as school was out for 3 months and I wouldn't be going to any of the classes. The cardigan for Tilly took me 3 weeks to do and I'm very pleased with it as too was Tilly, bless her cotton socks she wore it out on a really hot day.


My last project was the Baby Kina using the yarn I picked up from the Lancaster Yarn Shop whilst on our holiday's, I have just finished this today, I've yet to block it and sew on the buttons. This is for a special little person's birthday coming up.


And I can read a pattern too now woo hoo thanks to Ravelry, Lucie and the Internet.

And now on my knitting needles is this great dishcloth pattern - I'm using the gorgeous Lily Sugar'n Cream yarn.


What I love about knitting is, of an evening, once the girls are in bed, I can do it whilst watching TV and I do love my TV I am a night time TV junkie.

Do you love knitting? what's currently on your needles at the moment?


Friday 10 August 2012

Make it Perfect Meets Prints Charming

Living where I did, in Australia, in the lovely leafy suburb of Leichhardt, I was lucky to live so close to the Prints Charming studio and shop, through many visits and purchases of their beautiful fabric, embroidery panels etc,  I got to know the ladies Kath & Kirsten, so lovely are these ladies (they probably won't remember it, as it was before I shopped there regularly) that Kath, on a day where the shop was closed but a class was on, kindly let me into the shop to purchase some fabric for my lovely friend Lesley, the urgency was my friend lives in London and I was flying out the next day, she saved my bacon that day as I'd had the list of fabrics for ages naughty me.

The ladies also very kindly donated a raffle prize to the playgroup in Annandale I was chairperson of when I organised the Christmas Raffle - I mean how nice is that, they are truly wonderful ladies. My only regret is I still haven't managed to their fabulous screen printing class or their wonderful embroidery class. I did manage to book onto the screen printing class but then we got the news we were moving to Chicago so I couldn't do it, but I will one day.


Living in Australia and being a crafty lady I was also lucky to come across the Make it Perfect patterns - great patterns, great styles and easy to make, the first skirt I ever made for myself was the Versatile Wrap and I've made 3 of those now, so what could be more perfect ? well what was more perfect was Toni Coward the lady behind Make it Perfect made a book.

And I love this book - I have made 3 pairs of the 2-in-1 shorts, 2 Picnic in the Park Capelet and 1 Kid's Vest so far out of this book, I have the tea party skirt, Frothy Skirt, Gelato Skirt (for me) and Snug as a Bug PJ's bookmarked to make next.


But want I wanted to show you was the result of the Prints Charming fabric meeting one of the Make it Perfect Patterns by showing you the lovely Picnic in the Park Capelets - which I love and my girls love too, both of them straight away picked this fabulous Prints Charming fabric, Ruby wanted a pink inside and Tilly wanted purple so here are the results I hope you like them.
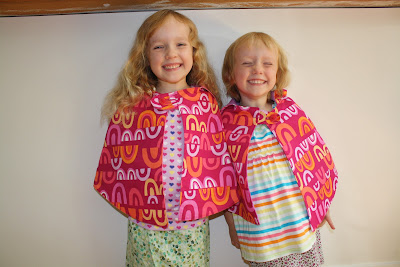


Here are my cheeky monkeys modelling their capes - as you can see they do dress themselves. 


Wednesday 8 August 2012

Road Trip - Day 14 & 15 - Homeward Bound

After our night in Pittsburgh, we set off early and said goodbye to Pennsylvania and hello to Ohio as we made our way to Cleveland. 


Mr C really wanted to go to the Rock & Roll Hall of Fame  Museum - Rock on Cleveland, so we left Mr C there, whilst the girls and I visited the Science Museum next door - the girls had lots of fun, discovering, playing & experimenting, the best bit for them was seeing a science show all about liquid Nitrogen, making robot frogs, and the real frog display it was fun, we then went up to the children's play area which the girls loved and they had a good play there before it was time to leave and make our way to Toledo our stop for the night before our last stretch to Chicago.


Our last day on the road saw us leave Toledo, travel through Indiana close to the Michigan border and make our way back into Illinois and back home to Chicago - it took us 4 hours to get home and that included a brunch stop at an IHOP restaurant, but finally we made it home safe and sound after 2 weeks on the road and one fantastic road trip.


A road trip I would do all over again tomorrow and travelling with a 5 & 3 year old was a great experience although challenging at points, and we had our moments, but more than anything it was a great experience for them and we all thoroughly enjoyed it, it was fun, we didn't need to rely on DVD players (this time) to keep them entertained, instead the girls had packed their own little suitcases full of toys they wanted to bring and play with and they had their colouring books and fantastic marker pen rolls made be. We made sure we didn't travel too far every day and planned kid friendly trips/activities to keep them busy, we always had snacks and drinks on hand for those I'm thirsty/hungry moments, but most of all you just have to get on and do it, otherwise you'd never travel with kids and when I think where my girls have been since they have been born they are pretty well travelled.